What You'll Learn
- Workspace
- Containers
- Kubernetes
- Deploying the webapp to Kubernetes
- Namespaces, labels, resources, probes
- Networking
- Operations
- Deploying a new version
- Storage
- Remember to use the same Google account you used to register for the workshop
- Recommended: Follow the workshop using the Google Cloud Cloud Console and Cloud Shell
- In your lab project, you'll find a GKE kubernetes cluster pre-provisioned for you
- Fetch your GKE cluster credentials into your
kubectlconfig:gcloud container clusters get-credentials lab-cluster --location europe-west4-a, wherelab-clusteris the name of your cluster andeurope-west4-ais the region- If needed, change the cluster name and location
- Test your
kubectlconfig:kubectl version,kubectl cluster-info - Enable kubectl autocompletion for Bash:
source <(kubectl completion bash)- Optionally, enable it permanently for your user:
echo 'source <(kubectl completion bash)' >>~/.bashrc
- Optionally, enable it permanently for your user:
- Clone this repo in your home directory:
cd ~,git clone https://github.com/Indavelopers/codelabs-indavelopers-com.git- You can also use a different location. If so, mind your repo location when changing directories in next steps
Kubernetes deploys and manages containerized applications, using the OCI container standard. We will containerize a Python Flask hello-world webapp.
Webapp
The webapp code is in codelabs-content/introduction-to-k8s/webapp/src:
main.py: Main Python Flask webapp code.requirements.py: Python module dependencies in Pip requirements format.venv: Python virtual environment.Dockerfile: Dockerfile for the container image.
Check the app locally:
- Work in the webapp dir:
cd ~/codelabs-indavelopers-com/codelabs/introduction-to-k8s/webapp/src - Activate the virtual environment:
source venv/bin/activate - Install Python dependencies:
pip install -r requirements - Run Flask in debug mode:
flask --app main run --debug - Check the app locally on
localhost:5000with the Cloud Shell "Web preview" option.- Cancel the Flask debug server with
Ctrl+C - Deactivate the virtual environment:
deactivate
- Cancel the Flask debug server with
Containerize the webapp
Create a container image using the provided Dockerfile and push it to the provided container repository in Google Artifact Registry:
- Check the envvar setting your Google Cloud project ID in Cloud Shell:
echo $GOOGLE_CLOUD_PROJECT- If needed, change the project ID (
YOUR_PROJECT_ID) and set up the envvar again:gcloud config set project YOUR_PROJECT_ID,export GOOGLE_CLOUD_PROJECT=YOUR_PROJECT_ID
- If needed, change the project ID (
- Create the container image locally with Docker:
docker build -t europe-west4-docker.pkg.dev/$GOOGLE_CLOUD_PROJECT/lab-repo/webapp:v1 . - Check the containerized app locally on
localhost:5000:docker run -p 5000:5000 europe-west4-docker.pkg.dev/$GOOGLE_CLOUD_PROJECT/lab-repo/webapp:v1 - Authenticate your local Docker installation with your user account:
gcloud auth configure-docker europe-west4-docker.pkg.dev - Push the container image to Google Artifact Registry:
docker push europe-west4-docker.pkg.dev/$GOOGLE_CLOUD_PROJECT/lab-repo/webapp:v1 - Check the container image on Google Artifact Registry: In the Cloud Console, navigate to Google Artifact Registry, check the
lab-repoDocker repository, and find your pushed container image
"Kubernetes is my container shepherd, it maintains my containerized applications for me."
- Kubernetes is an OSS container orchestrator for OCI containers maintained by the CNCF, initially developed by Google based on Borg.
- Kubernetes acts as an intermediate declarative layer, hiding the complex infrastructure from the user.
- This OSS intermediate layer standarizes the underlying infrastructure, so that the app can be migrated ‘as is' from one environment to another, and the user uses the same API, commands and tools.
- Kubernetes was designed from the ground up to be a "platform for developing platforms", with API extensibility in mind.
- The original design goal for Kubernetes was to become the single cluster for all applications and workloads, sharing the same resources in a more compact manner (From Google to the world: The Kubernetes origin story)
Kubernetes follows:
- "Object over object over object".
- "Abstraction over abstraction over abstraction".
Architecture

Pods
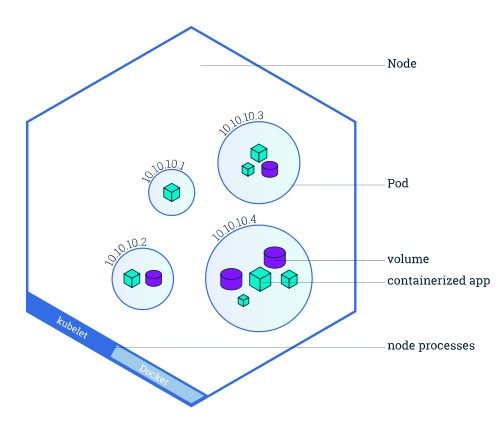
- Pods are the minimum deployment and management unit in Kubernetes.
- Pods abstract "an application deployed on a server". Like a server, a Pod:
- Can run more than one container, as a server runs more than one process.
- For example, auxiliary containers or init containers.
- Runs an internal loopback network where conatiners can communicate with each other on different ports, as different processes on a server communicate using
localhost. - Have a single IP, where containers can open ports for external communication, as different processes on a server can use the single server IP
- Allows all containers to individually mount and use the shared storage volumes, as different processes on a server can mount the same storage volumes.
- Can run more than one container, as a server runs more than one process.
Running a Pod
You can create Kubernetes objects, like a Pod, using imperative commands. This is useful for quick tests and learning, but for production workloads, it's recommended to use declarative manifests (YAML files).
- Run a Pod named
webappusing thewebappimage you pushed to Artifact Registry:kubectl run webapp --image=europe-west4-docker.pkg.dev/$GOOGLE_CLOUD_PROJECT/lab-repo/webapp:v1 - Check the status of your Pod. Wait for it to be in the
Runningstate:kubectl get pods - To access the application running inside the Pod from your Cloud Shell, you can use port-forwarding. This will forward traffic from a port on your local machine (Cloud Shell) to the port inside the Pod:
kubectl port-forward pod/webapp 5000:5000 - Now you can use the Cloud Shell "Web preview" on port 5000 to see your "Hello, world!" message.
- Once you are done, stop the port-forwarding with
Ctrl+Cand delete the Pod to clean up your environment:kubectl delete pod webapp
- Kubernetes objects, desired vs actual status, manifests
- Declarative object configuration
- Controllers
- Deployments
- ReplicaSets
Deploying the webapp
- Work in
webapp/manifests:cd ~/codelabs-indavelopers-com/codelabs/introduction-to-k8s/webapp/manifests - Replace
YOUR_PROJECT_IDin the Deployment manifest with your actual project ID:sed -i "s/YOUR_PROJECT_ID/$GOOGLE_CLOUD_PROJECT/g" webapp-deployment.yaml - Check the Deployment manifest at
webapp-deployment.yaml:cat webapp-deployment.yaml - Create the Deployment:
kubectl apply -f webapp-deployment.yaml - Check the Deployment and its Pods:
kubectl get all
Declarative approach
With a declarative approach, you can manage any object with full idempotency:
- If the resource with the same Kind and name doesn't exists, it will be created.
- If it exists, and there's no change in the manifest, it will remain unchanged.
- If it exists, and there's a change in the manifest, it will be updated.
Let's test this, checking at each step if the Deployment is changed or unchanged, by using kubectl apply -f MANIFEST_FILE.yaml:
- Try to recreate the Deployment again without changes:
kubectl apply -f webapp-deployment.yaml - Now, modify the manifest with a single replica Pod:
- Using your desired editor, modify
replicas: 3toreplicas: 1inwebapp-deployment.yaml. - For example, use Cloud Shell Editor:
edit webapp-deployment.yaml - Redeploy the Deployment:
kubectl apply -f webapp-deployment.yaml - Check the Deployment and its Pods:
kubectl get all
- Using your desired editor, modify
- Modify the number of replicas back to 3 and redeploy again:
kubectl apply -f webapp-deployment.yaml - Check the Deployment and its Pods:
kubectl get all - Now delete the Deployment and redeploy it:
kubectl delete -f webapp-deployment.yaml,kubectl apply -f webapp-deployment.yaml - Check the Deployment and its Pods:
kubectl get all
Control loop
Kubernetes control plane's kube-controller-manager runs a control loop for all Kubernetes controllers, like Deployments.
The control loop checks the Objects status and spec, and if it finds a diff, performs any remediation action needed to get the status back to the desired state.
- Get the name of one Pod managed by the Deployment:
kubectl get pods - Kill this Pod:
kubectl delete pods NAME_OF_THE_POD - Check how Kubernetes control loop automatically recreates a new Pod:
kubectl get all
Namespaces
Namespaces allows the separation of operations, access control, and resource asignation for different applications.
- Check default Kubernetes namespaces:
kubectl get namespaces - Create a new namespace for the webapp:
kubectl create -f webapp-namespace.yaml - Check the new namespace:
kubectl get namespaces - Delete the webapp Deployment from the
defaultnamespace:kubectl delete -f webapp-deployment.yaml - Deploy the Deployment to the new namespace:
kubectl apply -n webapp -f webapp-deployment.yaml - Check there are not resources in the default namespace:
kubectl get all - Check there are resources in the webapp namespace:
kubectl get all -n webapp
Labels
Labels allow to group together several resources, even of different kinds, and can also be used as selectors:
- For the
webapp-deployment, check the Deployment and Pods labels, and Deployment selector:cat webapp-deployment.yaml - Get all Pods filtering by label
app=webapp:kubectl get pods -l app=webapp -n webapp - Get all Deployments filtering by label
app=webapp:kubectl get deployments -l app=webapp -n webapp
Resources
For Kubernetes to be able to choose the best Node to deploy the Pods, and have a compact use of resources across the whole cluster, you should always asign request and limits for each container resources.
- Requests set the minimum requested resources to run the Pod in normal operations.
- Limits allows the containers to use more resources than requested if there are free resources in the Node, but:
- Kills the Pod if uses more memory than the limit.
- Limits the containers to the CPU limit.
- Check resources assigned to the single-container Pods in
webapp-deployment:cat webapp-deployment.yaml
You can also add ResourceQuota to a namespace to limit maximum resources for an app.
To enforce that every container has requests and limits declared, set up min. and max. requests and limits, and more, you can use LimitRange.
Probes
Kubernetes maintains the Pods running through controller objects like Deployments, recreating Pods in an exited status if the container process crashes.
Nevertheless, many times an application becomes unresponsive or present some issues while in a running state.
In order to Kubernetes to be able to check the application status, and not only the container, there are 3 available probes:
- Liveness: determine if the application is running but unable to make progress, and the container needs to be restarted.
- Readiness: determine if the container and the application is ready to start to receive traffic.
- Startup: determine if the application inside the container has started, and disables liveness and readiness probes until it succeds
You can find an example of the use of probes here: Configure Liveness, Readiness and Startup Probes.
Services acts as static endpoints to access application running in ephemeral Pods, distributing requests across Pods.
Services come in 4 flavours:
- ClusterIP: Internal service, only reacheable from inside the Kubernetes cluster - except for a Multi Cluster Service
- NodePort: External service, opens a high-number port in each Node's IP, either for private or public access.
- LoadBalancer: External service, uses either a cloud provider load balancer or other available implementations. Configurable for private or public access.
- ExternalName: Maps a Service to a DNS name, used for example in migration or hybrid environments.
In Google Cloud, LoadBalancer Services are implemented as regional external, non-proxy TCP Network Load Balancers.
Deploying a LoadBalancer Service
- Check the
webapp-serviceinmanifests:cat webapp-service.yaml - Create the Service:
kubectl apply -f webapp-service.yaml -n webapp - Check the Service:
kubectl get services -n webapp - Wait for the cloud external load balancer to adquire a public IP:
kubectl get services webapp-service -n webapp -w - Copy your external load balancer IP as
EXTERNAL_LOAD_BALANCER_IP:kubectl get services webapp-service -n webapp -o jsonpath='{.status.loadBalancer.ingress[0].ip}' - Check your application through the external load balancer's IP:
curl http://EXTERNAL_LOAD_BALANCER_IP - Check the load balancer automatically created: in the Cloud Console, search for
Network Services > Load Balancing, locate the load balancer and check its configuration.
L7 LoadBalancer
While a LoadBalancer Service is implemented as a L4 load balancer, you can also use Ingress or the new, preferred Gateway API to deploy L7 load balancers, which are implemented in Google Cloud as global external HTTPS Application Load Balancers.
Commands
Let's check in deep the most common Kubectl commands for normal operations and object troubleshooting:
Get
Get is the first basic Kubectl command and Kubernetes API method. It list objects of selected Kind in that namespace (default if not specified).
Try it:
kubectl get allkubectl get all -n webappkubectl get pods -n webappkubectl get pods -n webapp NAME_OF_PODkubectl get deployments -n webappkubectl get deployments -n webapp webapp-deployment- Get spec and status info for an object:
kubectl get deployments -n webapp webapp-deployment -o yaml > webapp-deployment_output.yaml,cat webapp-deployment_output.yaml- This way, you can get the YAML manifest with the spec for any created object, save it and use it for redeploying the object, or modifying it - in this case, mind the generation field.
Describe
Describe is the second basic Kubectl command and Kubernetes API method. It describes in full the spec and status of any object, but doesn't use the same manifest spec API schema (use kubectl get KIND OBJECT_NAME -o yaml for that).
Try it:
kubectl get pods -n webappkubectl describe pods NAME_OF_POD -n webappkubectl describe deployments webapp-deployment -n webappkubectl describe all
Getting firtst and then describing a Deployment is usually the best way to find it's current status and troubleshoot any problems, like the common CrashLoopBackOff error.
Logs
Logs is the third basic Kubectl command and Kubernetes API method. It returns logs for a specific Pod or, if there are multiple containers in that Pod, for a specific container.
Try it:
kubectl get pods -n webappkubectl logs NAME_OF_POD -n webapp
Exec
Exec is the fourth basic Kubectl command and Kubernetes API method. It allows to run a single command in a Pod container, or stablish an interactive TTY terminal.
Try it:
kubectl get pods -n webappkubectl exec NAME_OF_POD -n webapp -- ls /kubectl exec NAME_OF_POD -it -n webapp -- /bin/bashls /appwhoamiunameexit
HorizontalPodAutoscaler
After manually scaling the Deployment, changing the number of replicas and redeploying it, we'll configure a HorizontalPodAutoscaler:
- Check the
webapp-hpainmanifests:cat webapp-hpa.yaml - Create the HPA:
kubectl apply -f webapp-hpa.yaml -n webapp - Check the HPA:
kubectl get hpa webapp-hpa -n webapp - Watch for the number of running Pods for the
webapp-deploymentand thewebapp-hpaHPA behaviour:kubectl get hpa webapp-hpa -n webapp -w - Find the ClusterIP for the
webapp-serviceService, so we can test it internally instead of through the external load balancer asSERVICE_CLUSTERIP:kubectl get service webapp-service -n webapp -o jsonpath='{.spec.clusterIP}' - Now open another Cloud Shell terminal tab and create some load:
kubectl run -it load-generator --rm --image=busybox:1.37 --restart=Never -- /bin/sh -c "while sleep 0.01; do wget -q -O- http://SERVICE_CLUSTERIP; done" - In a couple of minutes, you should see the CPU increasing, and new Pods spinning up.
Now we'll explore how to deploy a new app version for the webapp Deployment. In this case, a new version will be defined by a new container image tag/version, and will be updated with a rolling update, which is the default Deployment updating policy.
First, let's create and push the new container image:
- Work in
codelabs-content/introduction-to-k8s/webapp/src:cd codelabs-content/introduction-to-k8s/webapp/src - Modify
main.pyto return a new message, eg. fromreturn 'Hello, world!'toreturn 'Hello, world! v2' - Test your webapp locally:
- Activate the Python virtual environment:
source venv/bin/activate - Run the Flask app in debug mode:
flask --app main run --debug - Check the app locally on
localhost:5000with the Cloud Shell "Web preview" option. - Cancel the Flask debug server with
Ctrl+C - Deactivate the virtual environment:
deactivate
- Activate the Python virtual environment:
- Now build the new container image version with the
v2tag:docker build -t europe-west4-docker.pkg.dev/$GOOGLE_CLOUD_PROJECT/lab-repo/webapp:v2 . - And push the new container image version to Artifact Registry:
docker push europe-west4-docker.pkg.dev/$GOOGLE_CLOUD_PROJECT/lab-repo/webapp:v2 - Check the container image on Google Artifact Registry:
gcloud artifacts docker images list europe-west4-docker.pkg.dev/$GOOGLE_CLOUD_PROJECT/lab-repo
Now let's deploy the new webapp-deployment version with a rolling update:
- Work in
codelabs-content/introduction-to-k8s/webapp/manifests:cd codelabs-content/introduction-to-k8s/webapp/manifests - Modify
webapp-deployment.yamlto use the newv2container image, using Cloud Shell Editor, nano, vim or emacs:edit webapp-deployment.yaml - Now redeploy the Deployment with a new version:
kubectl apply -f webapp-deployment.yaml -n webapp - Check the Deployment recreating its Pods:
kubectl get pods -n webapp -w, thenCtrl + C - Copy your external load balancer IP as
EXTERNAL_LOAD_BALANCER_IP:kubectl get services webapp-service -n webapp -o jsonpath='{.status.loadBalancer.ingress[0].ip}' - Check your application new version through the external load balancer's IP:
curl http://EXTERNAL_LOAD_BALANCER_IP
Sometimes, new application versions present some issues and you need to revert to the previous version. In that case, Kubernetes maintains a history of Deployments revisions that you can use for a quick rollback:
- Check the Deployment revision history:
kubectl rollout history deployment webapp-deployment -n webapp - You should see 2 revisions. Check the previous revision with index
1:kubectl rollout history deployment webapp-deployment -n webapp --revision 1 - Rollback to the previous revision:
kubectl rollout undo deployment webapp-deployment -n webapp- You could also specify to which revision to rollback with
kubectl rollout undo deployment webapp-deployment -n webapp --to-revision 1
- You could also specify to which revision to rollback with
- Now check again the Deployment recreating its Pods:
kubectl get pods -n webapp -w, thenCtrl + C - Check the status of the rollout/rollback:
kubectl rollout status deployment webapp-deployment -n webapp - When all Pods are ready, check again your application new version through the external load balancer's IP:
curl http://EXTERNAL_LOAD_BALANCER_IP - Describe the Deployment and check the container image version in use:
kubectl describe deployments webapp-deployment -n webapp
If you were able to solve the issue, and want to rollback again to v2, you can rollback to that revision:
- Rollback to the previous revision:
kubectl rollout undo deployment webapp-deployment -n webapp --to-revision 2 - Check the Deployment revision history with the new revision:
kubectl rollout history deployment webapp-deployment -n webapp - Now check again the Deployment recreating its Pods:
kubectl get pods -n webapp -w, thenCtrl + C - When all Pods are ready, check again your application "new" version through the external load balancer's IP:
curl http://EXTERNAL_LOAD_BALANCER_IP
In this section, we'll explore how Kubernetes manages data storage, through 2 types of Volumes, ConfigMaps and Secrets, and through PersistentVolumes and PersistentVolumeClaims.
As we discussed, Volumes can be mounted by any container in the Pod, and can be used to store information and/or to communicate between containers in the Pod.
Ephemeral Volumes share the same lifecycle as their Pod, while PersistentVolumes persists even if the Pod has been deleted, so that the data can be persisted or the cluster admin can create a snapshot and recicle the storage.
ConfigMaps
ConfigMaps are Volumes used to store non-sensitive configuration for your applications, and can be consumed as files or environment variables.
ConfigMaps as Volumes
Let's create a ConfigMap with some test data:
- Work in
codelabs-content/introduction-to-k8s/webapp/manifests:cd codelabs-content/introduction-to-k8s/webapp/manifests - Check the
test-configmap.yamlinmanifests, noticing the data field:cat test-configmap.yaml - Create the ConfigMap in the
defaultnamespace:kubectl apply -f test-configmap.yaml - Check the ConfigMap created and its contents:
kubectl get configmap,kubectl describe configmap test-configmap
Now let's create a Pod with a Volume, populated with the ConfigMap data:
- Check the Pod with a mounted Volume:
cat test-configmap-volume-pod.yaml - Create the Pod:
kubectl apply -f test-configmap-volume-pod.yaml - Check the Pod, its container and Volume:
kubectl get pods,kubectl describe pod test-configmap-volume-pod - Check the Pod's logs to see the content of the Volume:
kubectl logs test-configmap-volume-pod
ConfigMaps as environment variables
Data from a ConfigMap can also be consumed as environment variables.
Let's create another Pod which consumes the same ConfigMap data, but as environment variables:
- Check the Pod:
cat test-configmap-env-pod.yaml - Create the Pod:
kubectl apply -f test-configmap-env-pod.yaml - Check the Pod, its container and environment variables:
kubectl get pods,kubectl describe pod test-configmap-env-pod - Check the Pod's logs to see the content of the environment variables:
kubectl logs test-configmap-env-pod
Secrets
Secrets can be used in the same way as ConfigMaps. The only difference is that Secrets ofuscate their contents to developers, and thus can be used to store sensitive data as passwords and certificates.
Adding to the 2 previous ConfigMap examples, you can also configure all key-value pairs in a ConfigMap or Secret as environment variables:
- Check the
test-secret.yamlinmanifests:cat test-secret.yaml - Create the Secret in the
defaultnamespace:kubectl apply -f test-secret.yaml - Check the Secret created and its contents:
kubectl get secret,kubectl describe secret test-secret
Now create another Pod which consumes all the Secret data pairs as environment variables:
- Check the Pod:
cat test-secret-env-pod.yaml - Create the Pod:
kubectl apply -f test-secret-env-pod.yaml - Check the Pod, its container and environment variables:
kubectl describe pod test-secret-env-pod - Check the Pod's logs to see the content of the environment variables:
kubectl logs test-secret-env-pod
PersistentVolumes and PersistentVolumeClaims
PersistentVolumes ("PV"s) reperesent an abstraction for any storage medium that provide storage resources to the cluster, and Pods can consume, in the same way as Nodes represent an abstraction for any compute medium that provide CPU and memory resources (physical servers, VMs, IoT, containers, etc.).
There are many storage mediums available as PVs, eg.
- Physical disks: SSDs, HDDs, etc.
- Remote storage (NAS)
- Virtual disks
- NFS
- Object storage
Unlike Volumes, PVs represent persistent media that doesn't share the same lifecycle as the Pod, and whose storage persist if the Pod is deleted.
PVs are consumed in Pods in the same way as Volumes are, mounted in the file system of one or many containers, but they differ in how the resources are assigned:
PVs use PersistentVolumeClaims ("PVC"s) as a way of requesting how much storage and of which type the Pod needs, and as a way of assigning or "linking" a Pod to a specific PVs. Thus, PVCs acts in a somewhat similar manner to resource requests for CPU and memory, here for the whole Pod and not for each container, as the PVs can be mounted in more than one container.
PVs and PVCs also allow the separation of concerns or responsabilities between developers/cluster users, and operators/cluster admins:
- Developers/cluster users simply state the storage requirements for the app, Pod or Deployment, via resources requests and PVCs, in a standard, compatible manner, whatever current infrastructure the Kubernetes cluster is deployed to.
- Operators/cluster admins are responsible of managing the cluster resources, providing either the PVs to the cluster, or the means to dinamically provision them. When the storage medium is no longer in use, they can backup the data and recicle it, either automatically or manually, or holding the PV if the application will be redeployed.
PVCs declare the requested amount of storage, mode of operation (single mount to a Node, mounted in multiple Nodes, etc.), and request sufficient storage performance through a specific StorageClass.
GKE already declares several StorageClass by default with a dinamic provisioner for GCE Persistent Disks, which allows the GKE cluster to dinamically provision PVs as Persistent Disks if there are non availabe for the PVC.
Let's explore how to create a PVC, consume it through a Pod, and have GKE dinamically provisioning a PV as requested to assign to the PVC and the Pod:
- Work in
codelabs-content/introduction-to-k8s/webapp/manifests:cd codelabs-content/introduction-to-k8s/webapp/manifests - Check the
test-pvc.yamlinmanifests:cat test-pvc.yaml- If the PVC doesn't specify a storageClass field, the default StorageClass in the cluster is used.
- Check the available StorageClasses:
kubectl get storageclass - Now create the PVC:
kubectl apply -f test-pvc.yaml - And check the PVC just created:
kubctl get persistentvolumeclaim
Then, let's create a Pod that uses the PVC:
- Check the
test-pvc-pod.yamlinmanifests, noticing the persistentVolumeClaim field:cat test-pvc-pod.yaml - Create the Pod:
kubectl apply -f test-pvc-pod.yaml - Check the Pod:
kubectl get pods,kubectl describe pod test-pvc-pod.yaml - Check the PVC is accesible in the Pod with a shell to the Pod:
kubectl exec -it test-pvc-pod -- sh - Create a simple text message as a webpage in the Pod:
echo "Test webpage in a PersistentVolume!" > /var/www/html/index.html,chmod +x /var/www/html/index.html - Verify the text file:
cat /var/www/html/index.html - And exit the shell to the Pod:
exit
Now that we checked the use of the PVC within the Pod, let's check the persistence of the PVC data if the Pod is deleted:
- Check the Pod is running:
kubectl get pods - Delete the Pod:
kubectl delete -f test-pvc-pod.yaml - List the Pods again and check that it was deleted:
kubectl get pods - The PVC should exist although the Pod was deleted:
kubectl get persistentvolumeclaim - Then redeploy the Pod:
kubectl apply -f test-pvc-pod.yaml - Access the Pod through a shell again:
kubectl exec -it test-pvc-pod -- sh - And check that the text file still exists and has the same content:
cat /var/www/html/index.html
This way, you created a PV dinamically through deploying a PVC and a Pod that consumes it, and checked how the PV persists if the Pod it's assigned to is deleted.